
Just as you can practice heart opening in your thoughts and emotions, you can also experience opening the heart space in your physical body.
Our physical heart space is very complex as you might imagine. Your heart resides within the thoracic cavity, which is surrounded by a bony cylinder (the rib cage) comprised of 12 ribs on the right and 12 on the left; your sternum (breastbone) in the front; and the spine in the back. The bones are held together by soft tissues, including muscles large and small; cartilage between the vertebrae in the spine, between the three parts of the sternum, and as part of each rib as it attaches to the sternum; and by ligaments, which join bone to bone. There are ligaments, for example, between each pair of vertebrae, and ligaments holding each rib onto its adjacent vertebrae. Your diaphragm, the dome—shaped muscle that separates the heart and lungs above from the digestive and reproductive organs below, forms the floor of the thoracic cavity.
Through asana and pranayama we can help keep this thoracic cavity happy and healthy for many years to come, which in turn will also have a positive effect on our mental, emotional, and spiritual bodies as well. Physically stretching the muscles in your chest, shoulders, and belly can create a deep emotional release, helping you to appreciate and honor yourself and your loved ones.
Within our Yoga is for Lovers yoga challenge this year, we took on 8 different heart opening, or back bending postures to help us increase energy, better our posture, cultivate compassion and connection, decrease isolation and depression, face our fears, and increase our breathing capacity, blood circulation, and our capacity for love, confidence and trust!
Cats & Cows
A wonderful way to start off any yoga practice is with a few rounds of Cat Pose to Cow Pose. Often abbreviated as Cat-Cow, the combination of these two poses helps warm up your spine and relieves back and neck tension while massaging your digestive organs and stretching and strengthening your front body and back body.


Bitilasana & Marjaryasana
Step-by-Step Instructions
Step 1
Start on your hands and knees in a “tabletop” position. Make sure your knees are set directly below your hips and your wrists, elbows and shoulders are in line and perpendicular to the floor. Center your head in a neutral position, eyes looking at the floor.
Step 2
As you inhale, lift your sitting bones and chest toward the ceiling, allowing your belly to sink toward the floor. Lift your head to look straight forward.
Step 3
As you exhale, round your spine toward the ceiling, making sure to keep your shoulders and knees in position. Release your head toward the floor, but don’t force your chin to your chest.
Step 4
Repeat the movement and breath 10 – 15 times and then return to a neutral spine.
Modifications & Variations
Cat-Cow is a great pose for beginners — there should be no pain and very little discomfort (if any) when performed. If you need to modify the pose to make it more comfortable, try these simple changes to find a variation that works best for you:
- If your wrists hurt, place your forearms on the floor.
- Place your forearms on a bolster or stack of firm blankets to lift your torso more upright. This variation is especially useful for women who are pregnant.
- If your knee caps hurt, fold your mat or place a firm blanket under your knees.
- You can practice this pose throughout your day and while traveling. Sit in a chair (or airplane/bus seat) with your feet flat on the floor. Press your hands against a table, desk, or wall in front of you and perform the same spinal movements as in the regular pose.
Forward Fold with Shoulder Stretch
This pose is going to help you open up all the muscles in your shoulders, as well as create openness and space in your chest.
I love this pose because it also works to open up the biceps and forearms—muscles we tend to forget about when we are stretching.


Prasarita Padottanasana II
Step-by-Step Instructions
Step 1
Stand in Tadasana (Mountain Pose) then step your feet apart anywhere from 3 to 4 1/2 feet (depending on your height: taller people should step wider). Rest your hands on your hips. Make sure your inner feet are parallel to each other. Lift your inner arches by drawing up on the inner ankles, and press the outer edges of your feet and ball of the big toe firmly into the floor. Engage the thigh muscles by drawing them up. Inhale and lift your chest, making the front torso slightly longer than the back.
Step 2
Interlace your fingers behind your back and press your thumbs into your sacrum.
Step 3
Exhale and, maintaining the length of the front torso, lean the torso forward from the hip joints. Move your spine evenly into the back torso so that your back is slightly concave from the tailbone to the base of the skull.
Step 4
If you like, you can allow your knuckles to reach up and over head toward the wall in front of you, stretching through your armpits, chest, and shoulders.
Step 5
Stay in the pose anywhere from 30 seconds to 1 minute. Then use your inhale breath to draw upward to standing slowly and smoothly, bringing your hands back to your low back. Then gently release fingers and roll out shoulders.
The Modifications and Props
If you are finding it difficult to keep hands together while rotating through your shoulders, try using a strap or towel. Bringing the strap behind your hands, keep fists about shoulder width apart or wider. The further apart your thumbs are the less intense the stretch will be.
Cobras Big and Small
We see this posture quite a bit in Vinyasa classes and throughout our Surya Namaskar. It is a great way to strengthen and stretch our front and back core as well as create a little stability in the shoulder girdle and length in the spine.


Bhujangasana
Step-by-Step Instructions
Step 1
Lie on the floor on your belly. Stretch your legs back, tops of the feet on the floor. Spread your hands on the floor under your shoulders or a few inches back by your lowest ribs. Hug the elbows back into your body.
Step 2
Press the tops of the feet and thighs and the pubis firmly into the floor.
Step 3
On an inhalation, begin to press palms into the mat to lift the chest off the floor, going only to the height at which you can maintain a connection through your pubis to your legs. This might mean our belly button stays on the mat and we only lift through the upper chest, or it might mean our arms begin to straighten and the belly button starts to lift from the floor.
Press the tailbone toward your heels and lift the pubic bone toward the belly button. Firm but don’t harden the buttocks and press your toenails into the mat.
Step 4
Firm the shoulder blades against the back, puffing the side ribs forward. Lift through the top of the sternum but avoid pushing the front ribs forward, which only hardens the lower back. Distribute the back-bend evenly throughout the entire spine. Always think of creating length from tail to crown as opposed to sending your head back to your feet.
Step 5
Hold the pose anywhere from 15 to 30 seconds, breathing easily. Release back to the floor with an exhalation.
Modifications and Props
If you are very stiff it might be better to avoid doing this pose on the floor. Brace a metal folding chair against a wall, and do the pose with your hands on the front edge of the seat, balls of the feet on the floor.
If your wrists are tender, you can place a hand weight under each hand, gripping at the handle so you maintain a straight wrist.
Bow Pose
This pose is so called because it looks like an archer’s bow, the torso and legs representing the body of the bow, and the arms the string. It is a great way to create some fire and to feel energetically locked, loaded, and ready to take aim!
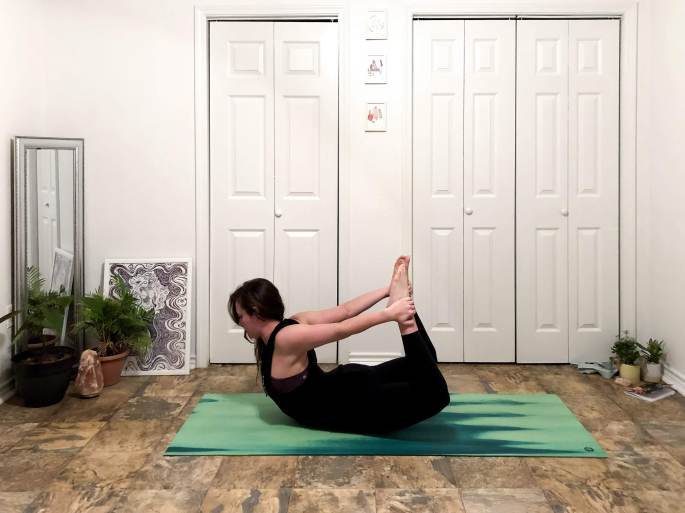
Dhanurasana
Step-by-Step Instructions
Step 1
Lie on your belly with your hands alongside your legs, palms up. Exhale and bend your knees, bringing your heels as close as you can to your buttocks. Reach back with your hands and take hold of your ankles (but not the tops of the feet). Make sure your knees aren’t wider than the width of your hips, and keep your knees hip width for the duration of the pose.
Step 2
Inhale and strongly lift your heels away from your buttocks and, at the same time, lift your thighs away from the floor. This will have the effect of pulling your upper torso and head off the floor. Burrow the tailbone down toward the floor, and keep your back muscles soft. As you continue lifting the heels and thighs higher, press your shoulder blades firmly against your back to open your heart. Draw the tops of the shoulders away from your ears. Gaze forward.
Step 3
With the belly pressed against the floor, breathing will be difficult. Breathe more into the upper chest and side ribs, and be sure not to stop breathing.
Step 4
Stay in this pose anywhere from 20 to 30 seconds. Release as you exhale, and lie quietly for a few breaths. You can repeat the pose once or twice more.
Modifications and Props
If it isn’t possible for you to hold your ankles directly, wrap a strap around the fronts of your ankles and hold the free ends of the strap, keeping your arms fully extended.
Camel
Backbending is a journey into the nervous system and all of the emotions our nerves and sense organs can trigger—from fear to elation. When practiced slowly and safely, backbends like Ustrasana have the power to reset your response to stress.


Ustrasana
Step-by-Step Instructions
Step 1
Kneel on the floor with your knees hip width and thighs perpendicular to the floor. Press your shins and the tops of your feet firmly into floor.
Step 2
Rest your hands on the back of your pelvis, bases of the palms on the tops of the buttocks, fingers pointing down. Use your hands to spread the back pelvis and lengthen it down through your tail bone. Lightly draw your tailbone forward. Inhale and lift your heart by pressing the shoulder blades against your back ribs.
Step 3
Now lean back against the firmness of the tail bone and shoulder blades. For the time being keep your head up, chin near the sternum, and your hands on the pelvis. Imagine you are drawing your lowest back ribs up and away from the top of your sacrum or where your hands are.
Beginners probably won’t be able to drop straight back into this pose (touching the hands to the feet simultaneously while keeping the thighs perpendicular to the floor). If you need to, tilt the thighs back a little from the perpendicular and minimally twist to one side to get one hand on the same-side foot. Then press your thighs back to perpendicular, turn your torso back to neutral, and touch the second hand to its foot. If you’re not able to touch your feet without compressing your lower back, turn your toes under and elevate your heels or simply keep your hands where they are
Step 4
See that your lower front ribs aren’t protruding sharply toward the ceiling, which hardens the belly and compresses the lower back. Instead imagine you are laying over a big beach ball, as opposed to bending in half, you are creating a long curve.
Press your palms firmly against your feet or hips, with the fingers pointing toward the toes or bum. Turn your arms outwardly so the elbow creases face forward, and pull your shoulders a little further form your ears. You can keep your neck in a relatively neutral position, neither flexed nor extended, or drop your head back. But be careful not to strain your neck and harden your throat.
Step 5
Stay in this pose anywhere from 30 seconds to a minute.
To exit, bring your hands to your hips. Inhale and lift the head and torso up by pushing the hip points down, toward the floor. If your head is back, lead with your heart to come up, not by jutting the chin toward the ceiling and leading with your brain. Sit back on your heels in a neutral spine for a moment, then rest in Child’s Pose for a few breaths.
Modifications and Props
You can also take a Yoga Block at it’s highest level to the outside of both heels and place your palms on the block instead of on your feet. This is a great option if your shoulders or quads are tight and you can’t quite reach your heels comfortably but want to work toward that deeper bend.
Full and Supported Fish
I love love love this pose. I take it as a supported posture most frequently, but honestly I can’t get enough in any way shape or form.


Matsyasana
Step-by-Step Instructions
Step 1
Lie on your back on the floor with your knees bent, feet on the floor. Inhale, lift your pelvis slightly off the floor, and slide your hands, palms down, below your buttocks. Then rest your buttocks on the backs of your hands (and don’t lift them off your hands as you perform this pose). Be sure to tuck your forearms and elbows up close to the sides of your torso.
Step 2
Inhale and press into your elbows and shoulders, lifting the chest. Depending on the intensity of your back bend, you can let the back or the top of the head is on the floor. However there should be very little weight on it.
Step 3
You can keep your knees bent or straighten your legs out onto the floor. If you do the latter, keep your thighs active, and press out through the heels. You can also bring your legs into Padmasana or Lotus Pose.
Want a little more challenge and core work? Lift your extended legs off the floor to a 45 degree angle. Extend through the heels. Then lift your arms up 45 degrees (parallel with the legs), palms of your hands touching and let the crown of the head rest on the floor.
Step 4
Hold this pose for about 10 – 15 seconds then release by using your exhale to press into your elbows and lift your head. Slide your hands from under your bum and lower your spine gently to the mat. It might feel nice to put your feet on the floor and take some windshield wiper twists.
Supported Fish Pose
Step-by-Step Instructions
This is one of those poses I could just live in for ever. Sometimes I like to set a timer on my phone for 3-10 minutes and just hang out here or do a heart opening meditation.
STEP 1
Begin seated with your knees bent and feet on the ground, hip’s distance apart.
STEP 2
Place a rolled up yoga mat length ways along the top half of your mat, or set two blocks in a wide T shape on the upper 3rd of your mat. The bottom block parallel to your spine and the top perpendicular for your head to rest on.
STEP 3
Gently lay back on the the blocks or the mat so that the lowest points of your shoulder blades line up with the lowest edge of the block or the lowest edge of the mat rests right at your waist line. Allow the blocks or the mat to line up with your spine and then support your head as you lay back, so that your heart is lifted gently from the floor.
STEP 4
You can adjust the height of either block as needed and then simply allow your body weight to relax down on to the support. Let your arms rest on either side and breath deep.
STEP 5
Stay for as long as you feel comfortable – typically at least a minute but no longer than 10. You’ll notice that your energy and intensitywill ebb and flow as you sit but try to let go of any resistance as with your exhale breath.
To release, bring your feet to the mat and draw your elbows underneath you then use your inhale to lift up slowly and remove the blocks. Lay back down to a flat spine for a few rounds of breath before moving on.
Dancer Pose
This pose develops greater flexibility in your spine, shoulders, and hamstrings. It also stretches the entire front of the body, while strengthening the back muscles, which improves posture.

Natarajasana
Step-by-Step Instructions
Step 1
Begin standing in Mountain Pose (Tadasana) with your feet together and your arms at your sides. Shift your weight onto your left foot. Bend your right knee and bring your right heel toward your right buttock. Reach your right hand down and clasp your right foot’s inner ankle. You can also loop a strap around the top of your right foot, and then hold onto the strap with your right hand. Draw your knees together.
Step 2
Reach your left arm overhead, pointing your fingertips toward the ceiling and facing your palm to the right. Fix your gaze softly at an un-moving spot in front of you. Make sure your left kneecap and toes continue to point directly forward.
Step 3
When you feel steady and comfortable, begin to press your right foot away from your body as you simultaneously lean your torso slightly forward. Keep your chest lifting and continue reaching your left hand’s fingertips up toward the ceiling. Raise your right foot as high as you can. Bring your left thigh parallel to the floor, or higher if possible. At the same time, press your tailbone toward the floor to avoid compressing your lower back. Do not let your right knee splay open to the side.
Step 4
Hold for 3-8 breaths. To release, very slowly and gently return to your starting position. Then lower your right foot and come back into Mountain Pose. Repeat the pose on the opposite side for the same amount of time.
Modifications & Variations
King Dancer Pose can be a great way to gain flexibility, strength, and poise. Be sure to modify the pose as needed, and ease up if you feel any pinching or jarring pain, especially in your back or neck. Here are a few simple modifications that will lighten or deepen the pose for you:
- If you can’t hold onto the ankle of your raised leg, use a strap. Wrap a yoga strap around the top of your foot, then bend your knee and come into the pose. Hold onto both ends of the strap with your same-side hand.
- If you are brand-new to the pose, practice Standing Thigh Stretch to gain the flexibility and strength needed for this pose.
- If it’s difficult to balance, rest your free hand on a wall, chair, or any other stable object.
- For a deeper stretch, hold your outer ankle with the opposite hand. For example, if your right ankle is raised, reach your left hand behind your body and hold onto your right foot’s outer ankle. Then extend your opposite arm forward and up.
Wheel Pose
Want to learn even more about this intense posture? Check out my blog post on it here!

Urdhvadhanuasana
Step-by-Step Instructions
Step 1
Lying on your back on the floor, bend your knees and set your feet on the floor, heels as close to the sitting bones as possible. Bend your elbows and spread your palms on the floor beside your head, forearms relatively perpendicular to the floor, fingers pointing toward your shoulders.
Step 2
Pressing your inner feet actively into the floor, exhale and push your tailbone up toward the pubis and lift your booty off the floor coming into a Bridge Pose. Keep your thighs and inner feet parallel. Take 2 or 3 breaths.
Step 3
When you are steady, firmly press the inner hands into the floor and your shoulder blades against the back to lift up onto the crown of your head. Make sure to keep your arms parallel. Continue to strengthen throughout the back body as you lift your head up off the floor and straighten your arms.
Step 4
Turn the upper thighs slightly inward and firm the outer thighs. Narrow the hip points and lengthen the tailbone toward the backs of the knees, lifting the pubis toward the navel. Turn the upper arms outward but keep the weight on the bases of the index fingers. Spread the shoulder blades across the back and let the head hang, or lift it slightly to look down at the floor.
Step 5
Stay in the pose anywhere from 5 to 10 seconds or more, breathing easily. Repeat anywhere from 3 to 10 times.
Feel free to come back to these postures any time you need a little lift in your heart and mind!
Now I want to hear from you!
What do you want out of next year’s challenge? What are you hoping to learn more about or types of postures would you want to focus on?
Comment or send me a message!

2 thoughts on “Yoga is for Lovers 2019 Round Up – The Postures”